Thursday, December 13, 2007
convert vmware workstation 6 image to vmware server image
Sunday, November 11, 2007
Bad designed query made the whole system stop responding
Anyway, Last friday, I was contacted by our helpdesk that our whole ERP system stop responding and everyone couldn't do anything on the system but wait. By running a check one the database, it turned out to be a query some ran causing the problem. I was bit confused initially coz the query was run from the application server. well, when I logoned to the app server later, I found out that one of my colleague was right there!
he was running a query to update one of the main table. the worst thing is, the query was made of 4 joins among 5 main tables and each of them is used intensively and contains hundreds of thousands of rows!
I believed that in such a situation, a 4 tables join is probably not a good option and can definitely cause big problem.
Tuesday, November 6, 2007
Building a SQL Server 2005 Cluster Lab with vmware, centos 4 & iSCSI software target
the lab consisted of 1 win2k3 domain controller, 2 win2k3 cluster nodes and 1 centos 4 with iSCSI Enterprise Target acting as SAN. everything works great except that sometime the 'host only' nic won't start automatically and thus I have to start it manually.
Use ThinkVintage Fingerprint Reader software with Acer Laptop
Monday, September 24, 2007
P2V: How To Make a Physical Linux Box Into a Virtual Machine
Over the last four days, I’ve been exploring how to convert physical Linux boxes into virtual machines. VMWare has a tool for doing P2V conversions, as they’re called, but as far as I can tell it only works for Windows physical machines and for converting various flavors of virtual machines into others.
I’ve had a Linux machine that I’ve used in my CS462 (Large Distributed Systems) class for years. The Linux distro has been updated over the years, but the box is an old 266MHz Pentium with 512Mb of RAM. Overall, it’s done surprisingly well—a testament to the small footprint of Linux. Still, I decided it was time for an upgrade.
Why Go Virtual
In an effort to simplify my life, I’m trying to cut down on the number of physical boxes I administer, so I decided I wanted the new version of my class server to be running on a virtual machine. This offers several advantages:
- Fewer physical boxes to manage
- Easier to move to faster hardware when needed
- Less noise and heat
I could have just rebuilt the whole machine from scratch on a new virtual machine, but that takes a lot of time and the old build isn’t that out of date (one year) and works fine. So, I set out to discover how to transfer a physical machine to a virtual machine. The instructions below give a few details specific to VMWare and OS X, but if you happen to use Parallels (or Windows), the vast majority of what I did is applicable and where it’s not, figuring it out isn’t hard. I’ve tried to leave clues and I’m open to questions.
Note: I’ve used this same process to transfer a VMWare virtual image to run on Parallels. The are probably easier ways, but this technique works fine for that purpose as well—it doesn’t matter if the source machine is physical or virtual.
The Process
The first step is to make an image of the source machine. I recommend g4l, Ghost for Linux. There are some detailed instructions on g4l available, but the basics are:
- Download the g4l bootable ISO and put it on a CD.
- Boot it on the source machine.
- Select the latest version from the resulting menu and start it up (you have to type g4l at the prompt).
- Select raw transfered over network and configure the IP address and the username/password for the FTP server you want the image transfered to.
- Give the new image a name.
- Select “backup” and sit back and watch it work.
Note that if you have more than one hard drive on the source machine, you’ll have to do each separately. I found that separately imaging each partition on each drive worked best. One tip: there are three compression options. Lzop works, in this application, nearly as GZip or BZip but with much less CPU load. Compression helps not only with storing the images, but also with transfering them around on the ‘Net, so you’ll probably want some kind of compression.
The next step is to create a virtual machine and put the images on it’s drive(s). Create a virtual machine in VMWare as you normally would, selecting the right options for the source OS. When you get to the screen that asks “Startup virtual machine and load OS” (or something like that), uncheck the box and you should be able to change the machine options.
The first thing you need to do with the new VM is create the right number and size of hard drives—and partitions on those drives—to match the partition images you’re going to restore.
For transfering single image machines to VMWare, just using the default drive, appropriately sized, worked fine. For more than one drive image, however, I found that making the drive type (SCSI/IDE) match the type on the source was easiest thing to do. Note that VMWare won’t let you make the main drive an IDE drive by default. You can always delete it and create a new drive that’s an IDE drive if you need to.
The second thing you need to do with the new VM is set the machine to boot from the CD ROM since we’ve got to start up g4l on the target machine.
On VMWare, you can enter the BIOS by pressing F2 while the virtual machine is loading. This isn’t as easy as it sounds since it starts quick. Once you’re there, however, it’s a pretty standard BIOS setup and changing the boot order is straight forward. On Parallels this is easier since the boot order is an option you can change in the VM’s settings.
If you’re creating partitions on the drives, you’ll need to boot from a ISO image for the appropriate Linux distro and create the partitions using the partition wiazrd, parted, or some other tool—whatever you’d normally do.
Next boot the VM from the g4l ISO image on your computer or the physical CD you made. If you have trouble, be sure the virtual CDROM is connected and powered on when the virtual machine is started. Start g4l and configure it the same way you did before, but this time, you’ll select “restore” from the options. g4l should start putting the images from the source machine onto the target. If you have more than one hard drive or partition image, you’ll have to restore each to a separate drive or partition—as appropriate—on the virtual machine.
When doing a raw transfer, I you need make the drives the same size as the machine you’re moving the image from (I’ve found that larger works OK, but smaller doesn’t). If the drives aren’t big enough to support the entire image, you’ll get “short reads” and not everything will be transfered. Note that you won’t get much complaint from g4l.
The virtual drives should theoretically only take as much space as they need, but it turns out that since you’re doing a raw transfer, you’ll fill them up with “space.” This is one of those instances where copying a sparse data structure results in one that isn’t. This results in awfully large disks—make sure you’ve got plenty of scratch disk space for this operation. More on large disks later.
Repairing and Booting the New Machine
 Linux panics if the init RAM disk is not updated (click to enlarge) |
Once the images are copied, you have to make them usable. If you just try to boot from them, you’ll likely see something like the screenshot shown on the right: a short message followed by a kernel panic. Before you can use the new machine, you have to do a little repair work on the old images.
- Get an emergency boot CD ISO for your flavor of Linux and boot the new virtual machine from it. Often you can just boot from the installation image and then enter a rescue mode. For example for Redhat, you can type “linux rescue” at the boot prompt and get into recovery mode.
- It will search for Linux partitions and should find any you’ve restored to the machine. You’ll have the option to mount these. Do so.
- Now, use the chroot command to change the root of the file system to the root partition. Mount any of the other partitions that you need (e.g. /boot).
- Run kudzu to find any new devices and get rid of old ones.
- Use mkinitrd to create a new init RAM disk. This command should work:
/sbin/mkinitrd -v -f /boot/initrd-2.2.12-20.img 2.2.12-20
Of course, you’ll have to substitute the right initrd name (look in /boot) and use the right version (look in /lib/modules).
If you get an error message about not being able to find the right modules, be sure that the last argument to mkinitrd matches what you see in /lib/modules exactly.
Now, you should be able to boot the machine. With any luck, it should work.
Disk Size Issues
When you restore the image, your new sparse disk will grow to the size of the image, even if the image is only partially full of real data. For example, my Linux box had a 6Gb drive (I told you it was ancient) that contained the root partition and a 100 Gb drive that I’d partitioned into two pieces: one 40Gb partition mounted as /home and a 60Gb partition mounted as /web. After restoring the images for these three partitions, I ended up with a 6Gb and a 107Gb files representing the virtual disks. This despite the fact that only 8Gb of the 107Gb actually contained any data.
Clearly, you don’t want 107Gb files hanging around if they can be smaller. One option is to do a file copy rather than an image. This would work fine for the /home and /web partitions in my case, but wouldn’t have worked for the root partition—I wanted an image for that. If you’ve just got one big partition, then you can’t use the file transfer option and still have exactly the same machine.
Fortunately there’s a relatively painless way of reducing the size of the disk to just what’s needed (thanks to Christian Mohn for the technique).
The first step is to zero out all the free space on each partition of the drive you want to shrink. This, in effect, marks the free space. You can do that easily with this command:
cat /dev/zero > zero.fill;sync;sleep 1;sync;rm -f zero.fill
After this runs, you’ll get an error that says “cat: write error: No space left on device”. That’s normal—you just filled the drive with one BIG file full of zeros, made sure it was flushed to the disk, and then deleted it.
Next you can use the VMWare supplied disk management tool to do the actual shrinking. For VMWare Workstation Manager, you use vmware-vdiskmanager, but the version of this program that ships with Fusion doesn’t support the shrink option. Note that this, and other support programs, are in
/Library/Application Support/VMware\ Fusion/
on OS X.
Fortunately, in OS X at least, there’s another program, called diskTool in
/Applications/VMware Fusion.app/Contents/MacOS/
that does support the shrink option (-k1). Running this command
diskTool -k 1 Luwak-IDE_0-1.vmdk
on my large disk reduced it from 107Gb to 8Gb!
A few notes: Apparently you have to perform the shrink option on the disks for a machine before any snapshots have been taken. Also, be sure to run the zero fill operation in each partition on the disk. The shrinking option takes a little time, but it’s well worth it. I haven’t tried this in Parallels, but I suspect the disk compaction option would work. If someone tries it, let me know.
Conclusion
So, after a lot of experimentation, some playing around, and a lot of long operations on large files, I have a virtual machine that’s a fairly accurate reproduction of the physical machine that it came from. I’ll be testing it over the next few days to make sure it’s usable.
On reflection, I needn’t have been so faithful to the structure on the physical machine. I could have created the right number of partitions on one drive rather than creating multiple drives. After all, the new drive can be as big as I like. Maybe I’ll do that next and see how things go…
Posted by windley on August 20, 2007 07:38 AM
Saturday, August 25, 2007
DB Admin
This blog will be used mainly to post technical topics related to my daily work.
Tuesday, July 3, 2007
Java EE 5 Notes
lisa yang
Overview
A Java EE application is delivered in an Enterprise Archive (EAR) file, a standard Java Archive (JAR) file with an .ear extension.
There are two types of deployment descriptors: Java EE and runtime. A Java EE deployment descriptor is defined by a Java EE specification and can be used to configure deployment settings on any Java EE-compliant implementation. A runtime deployment descriptor is used to configure Java EE implementation-specific parameters.
A Java EE module consists of one or more Java EE components for the same container type and one component deployment descriptor of that type. The four types of Java EE modules are as follows:
• EJB modules, which contain class files for enterprise beans and an EJB deployment descriptor. EJB modules are packaged as JAR files with a .jar extension.
• Web modules, which contain servlet class files, JSP files, supporting class files, GIF and HTML files, and a web application deployment descriptor. Web modules are packaged as JAR files with a .war (Web ARchive) extension.
• Application client modules, which contain class files and an application client deployment descriptor. Application client modules are packaged as JAR files with a .jar extension.
• Resource adapter modules, which contain all Java interfaces, classes, native libraries, and other documentation, along with the resource adapter deployment descriptor. Together, these implement the Connector architecture (see J2EE Connector Architecture, page 24) for a particular EIS. Resource adapter modules are packaged as JAR files with an .rar (resource adapter archive) extension.
Enterprise JavaBeans Technology
There are two kinds of enterprise beans: session beans and message-driven beans. A session bean represents a transient conversation with a client. When the client finishes executing, the session bean and its data are gone. A message-driven bean combines features of a session bean and a message listener, allowing a business component to receive messages asynchronously. Commonly, these are Java Message Service (JMS) messages.
In Java EE 5, entity beans have been replaced by Java™ persistence API entities. An entity represents persistent data stored in one row of a database table. If the client terminates, or if the server shuts down, the persistence manager ensures that the entity data is saved.
Java servlet technology lets you define HTTP-specific servlet classes. A servlet class extends the capabilities of servers that host applications that are accessed by way of a request-response programming model.
JavaServer Pages™ (JSP™) technology lets you put snippets of servlet code directly into a text-based document.
The JavaServer Pages Standard Tag Library (JSTL) encapsulates core functionality common to many JSP applications.
JavaServer Faces technology is a user interface framework for building web applications.
The Java Message Service (JMS) API is a messaging standard that allows Java EE application components to create, send, receive, and read messages.
The Java Transaction API (JTA) provides a standard interface for demarcating transactions. The Java EE architecture provides a default auto commit to handle transaction commits and rollbacks.
Java EE applications use the JavaMail™ API to send email notifications.
The JavaBeans Activation Framework (JAF)
The Java API for XML Processing (JAXP), part of the Java SE platform, supports the processing of XML documents using Document Object Model (DOM), Simple API for XML (SAX), and Extensible Stylesheet Language Transformations (XSLT).
The Java API for XML Web Services (JAX-WS) provides support for web services that use the JAXB API for binding XML data to Java objects.
The Java Architecture for XML Binding (JAXB) provides a convenient way to bind an XML schema to a representation in Java language programs.
The Java API for XML Registries (JAXR) lets you access business and generalpurpose registries over the web. JAXR supports the ebXML Registry and Repository standards and the emerging UDDI specifications.
The J2EE Connector architecture is used by tools vendors and system integrators to create resource adapters that support access to enterprise information systems that can be plugged in to any Java EE product.
The Java™ Database Connectivity (JDBC) API lets you invoke SQL commands from Java programming language methods.
The Java™ Persistence API is a new all Java standards based solution for persistence. Persistence uses an object-relational mapping approach to bridge the gap between an object oriented model and a relational database.
The Java Naming and Directory Interface™ (JNDI) provides naming and directory functionality, enabling applications to access multiple naming and directory services, including existing naming and directory services such as LDAP, NDS, DNS, and NIS.
The Java Authentication and Authorization Service (JAAS) provides a way for a Java EE application to authenticate and authorize a specific user or group of users to run i
The Sun Java System Application Server Platform Edition 9 is a fully cmpliant implementation of the Java EE 5 platform.
To start the Application Server,
asadmin start-domain --verbose domain1
• The Application Server’s port number. The default is 8080.
• The administration server’s port number. The default is 4848.
• An administration user name and password.
To stop the Application Server,
asadmin stop-domain domain1
To start the Admin Console,
http://localhost:4848/asadmin/
To start the Java DB database server,
asadmin start-database
To stop the Java DB server,
asadmin stop-database
Web Tier
Web Application Life Cycle
# Develop the web component code.
# Develop the web application deployment descriptor.
# Compile the web application components and helper classes referenced by the components.
# Optionally package the application into a deployable unit.
# Deploy the application into a web container.
# Access a URL that references the web application.
Web Modules
A context root must start with a forward slash (/) and end with a string.
(sun-web.xml)
Mapping URLs to Web Components When a request is received by the web container it must determine which web component should handle the request. It does so by mapping the URL path contained in the request to a web application and a web component. A URL path contains the context root and an alias:
http://host:port/context_root/alias
Setting the Component Alias
The alias identifies the web component that should handle a request. The alias path must start with a forward slash (/) and end with a string or a wildcard expression with an extension (for example, *.jsp). Since web containers automatically map an alias that ends with *.jsp, you do not have to specify an alias for a JSP page unless you wish to refer to the page by a name other than its file name.
servlets need to be mapped in the web.xml file
Declaring Welcome Files (WEB-INF/web.xml)
Setting Initialization Parameters (WEB-INF/web.xml)
# A param-name element that specifies the context object.
# A param-value element that specifies the parameter to pass to the context object.
# A context-param element that encloses the previous two elements.
Mapping Errors to Error Screens (web.xml ->Error Page )
Declaring Resource References
If your web component uses objects such as enterprise beans, data sources, or web services, you use Java EE annotations to inject these resources into your application.
you can only inject resources into container-managed objects.
Web Components That Accept Resource Injections
Component
Interface/Class
Servlets
javax.servlet.Servlet
Servlet Filters
javax.servlet.ServletFilter
Event Listeners
javax.servlet.ServletContextListener
javax.servlet.ServletContextAttributeListener
javax.servlet.ServletRequestListener
javax.servlet.ServletRequestAttributeListener
javax.servlet.http.HttpSessionListener
javax.servlet.http.HttpSessionAttributeListener
javax.servlet.http.HttpSessionBindingListener
Taglib Listeners
same as above
Taglib Tag Handlers
javax.servlet.jsp.tagext.JspTag
Managed Beans
Plain Old Java Objects
Declaring a Reference to a Resource The @Resource annotation is used to declare a reference to a resource such as a data source, an enterprise bean, or an environment entry. This annotation is equivalent to declaring a resource-ref element in the deployment descriptor.
@Resource javax.sql.DataSource catalogDS;
public getProductsByCategory() {
// get a connection and execute the query
Connection conn = catalogDS.getConnection();
..
}
multiple resources:
@Resources ({
@Resource (name="myDB" type=java.sql.DataSource),
@Resource(name="myMQ" type=javax.jms.ConnectionFactory)
})
Declaring a Reference to a Web Service
The @WebServiceRef annotation provides a reference to a web service.
...
import javax.xml.ws.WebServiceRef;
...
public class ResponseServlet extends HTTPServlet {
@WebServiceRef(wsdlLocation=
"http://localhost:8080/helloservice/hello?wsdl")
static HelloService service;
Duke's Bookstore Examples
Declaring a Reference to a Web Service
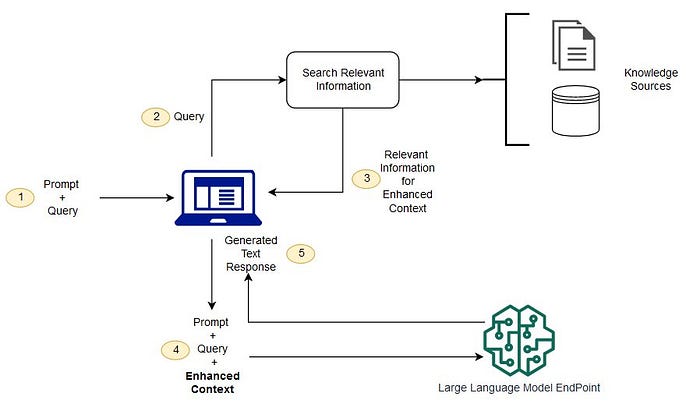
Elevating LLM Deployment with FastAPI and React: A Step-By-Step Guide
In a previous exploration , I delved into creating a Retrieval-Augmented-Generation (RAG) demo, utilising Google’s gemma model, Hugging ...